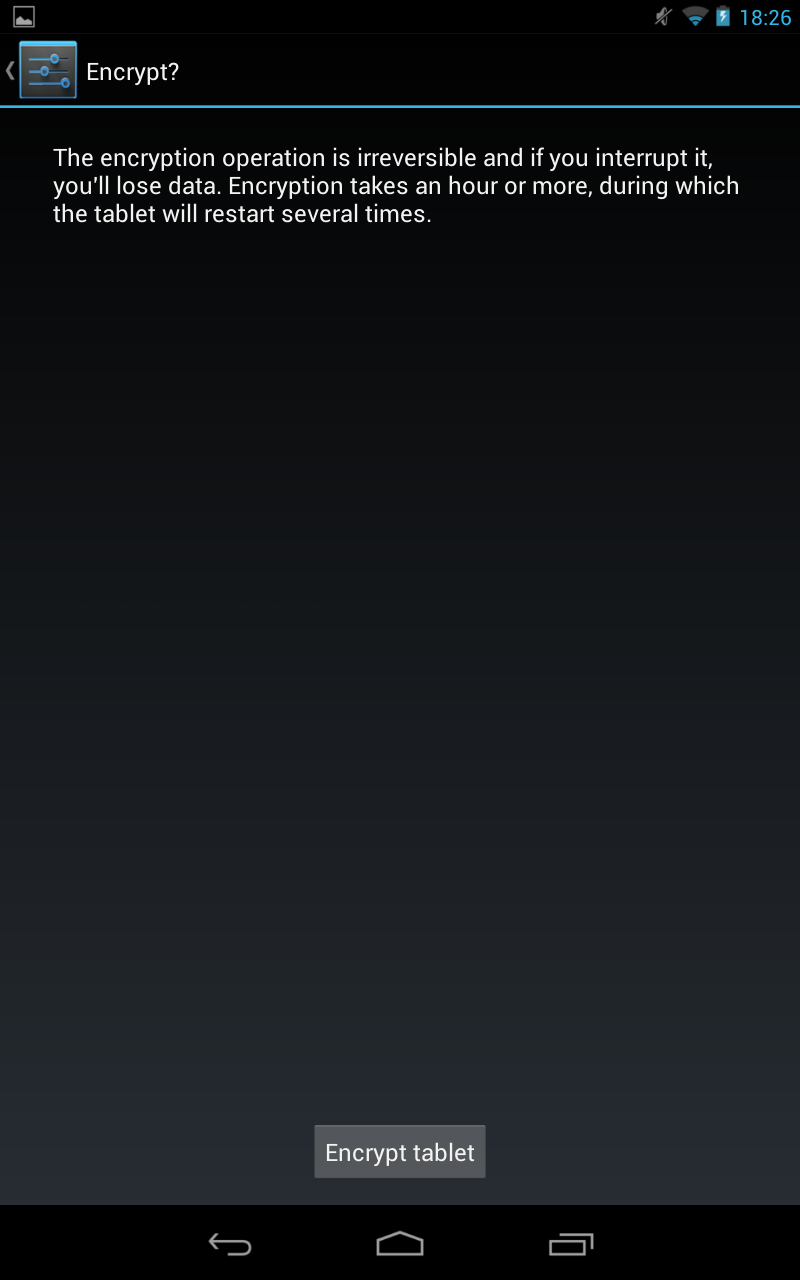
And like all other minor upgrades: no information about the updates....

If you compare the information you notice the kernel upgrade from 3.1.10-gee1a0b2 to 3.1.10-g4776c86.
For a complete history of all updates visit this posting.
<-- Start of StatCounter Code for Default Guide -->
(script type="text/javascript")
var sc_project=NNN;
var sc_invisible=1;
...
include 'counter.html';


.png)
.png)
.png)
.png)
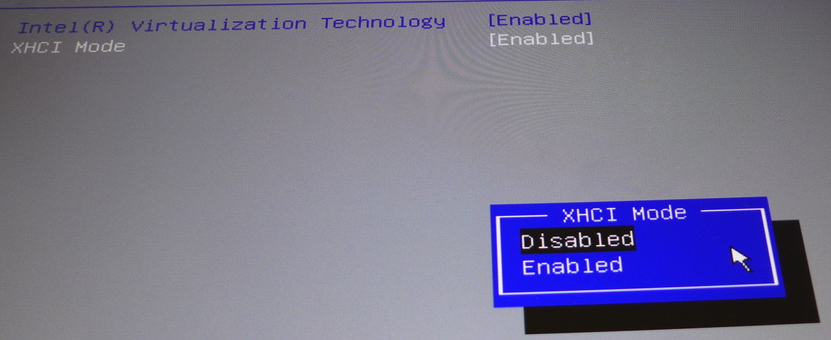
But now rebooting works like expected (with Ubuntu and Windows 8).After some more reboots and trying to start ubuntu, booting ubuntu only works randomly. Sometimes it worked after walking through BIOS/UEFI. Sometime it did not work at all.
Disable secure boot
Run boot-repair once again

But now rebooting works like expected (with Ubuntu and Windows 8).
-rw-r--r-- 1 root root 844882 Okt 9 2012 abi-3.5.0-17-genericThe directory grub contains all files related to grub/grub2. The directory efi is a mountpoint:
-rw-r--r-- 1 root root 17402 Apr 21 18:48 boot.efi.txt
-rw-r--r-- 1 root root 0 Apr 21 18:49 boot.txt
-rw-r--r-- 1 root root 147884 Okt 9 2012 config-3.5.0-17-generic
drwxr-xr-x 4 root root 512 Jan 1 1970 efi
drwxr-xr-x 5 root root 4096 Apr 21 18:45 grub
-rw-r--r-- 1 root root 23040071 Apr 21 16:33 initrd.img-3.5.0-17-generic
-rw-r--r-- 1 root root 176764 Jan 3 23:48 memtest86+.bin
-rw-r--r-- 1 root root 178944 Jan 3 23:48 memtest86+_multiboot.bin
-rw------- 1 root root 2901710 Okt 9 2012 System.map-3.5.0-17-generic
-rw-r--r-- 1 root root 5129040 Okt 17 2012 vmlinuz-3.5.0-17-generic
-rw-r--r-- 1 root root 5130968 Okt 17 2012 vmlinuz-3.5.0-17-generic.efi.signed
/dev/sda3 on /boot/efi type vfat (rw)This partition is a partition, which was created from Windows 8 and contains the following:
/dev/sda3 258048 48975 209073 19% /boot/efi
./efi/Boot
./efi/Boot/bg-BG
./efi/Boot/bg-BG/bootmgr.exe.mui
./efi/Boot/BCD.LOG
./efi/Boot/cs-CZ
./efi/Boot/cs-CZ/bootmgr.exe.mui
./efi/Boot/cs-CZ/memtest.exe.mui
./efi/Boot/da-DK
./efi/Boot/da-DK/bootmgr.exe.mui
./efi/Boot/da-DK/memtest.exe.mui
./efi/Boot/de-DE
./efi/Boot/de-DE/bootmgr.exe.mui
./efi/Boot/de-DE/memtest.exe.mui
./efi/Boot/el-GR
./efi/Boot/el-GR/bootmgr.exe.mui
./efi/Boot/el-GR/memtest.exe.mui
./efi/Boot/en-GB
./efi/Boot/en-GB/bootmgr.exe.mui
./efi/Boot/en-US
./efi/Boot/en-US/bootmgr.exe.mui
./efi/Boot/en-US/memtest.exe.mui
./efi/Boot/es-ES
./efi/Boot/es-ES/bootmgr.exe.mui
./efi/Boot/es-ES/memtest.exe.mui
./efi/Boot/et-EE
./efi/Boot/et-EE/bootmgr.exe.mui
./efi/Boot/fi-FI
./efi/Boot/fi-FI/bootmgr.exe.mui
./efi/Boot/fi-FI/memtest.exe.mui
./efi/Boot/fr-FR
./efi/Boot/fr-FR/bootmgr.exe.mui
./efi/Boot/fr-FR/memtest.exe.mui
./efi/Boot/hr-HR
./efi/Boot/hr-HR/bootmgr.exe.mui
./efi/Boot/hu-HU
./efi/Boot/hu-HU/bootmgr.exe.mui
./efi/Boot/hu-HU/memtest.exe.mui
./efi/Boot/it-IT
./efi/Boot/it-IT/bootmgr.exe.mui
./efi/Boot/it-IT/memtest.exe.mui
./efi/Boot/ja-JP
./efi/Boot/ja-JP/bootmgr.exe.mui
./efi/Boot/ja-JP/memtest.exe.mui
./efi/Boot/ko-KR
./efi/Boot/ko-KR/bootmgr.exe.mui
./efi/Boot/ko-KR/memtest.exe.mui
./efi/Boot/lt-LT
./efi/Boot/lt-LT/bootmgr.exe.mui
./efi/Boot/lv-LV
./efi/Boot/lv-LV/bootmgr.exe.mui
./efi/Boot/memtest.exe
./efi/Boot/nb-NO
./efi/Boot/nb-NO/bootmgr.exe.mui
./efi/Boot/nb-NO/memtest.exe.mui
./efi/Boot/nl-NL
./efi/Boot/nl-NL/bootmgr.exe.mui
./efi/Boot/nl-NL/memtest.exe.mui
./efi/Boot/pl-PL
./efi/Boot/pl-PL/bootmgr.exe.mui
./efi/Boot/pl-PL/memtest.exe.mui
./efi/Boot/pt-BR
./efi/Boot/pt-BR/bootmgr.exe.mui
./efi/Boot/pt-BR/memtest.exe.mui
./efi/Boot/pt-PT
./efi/Boot/pt-PT/bootmgr.exe.mui
./efi/Boot/pt-PT/memtest.exe.mui
./efi/Boot/qps-ploc
./efi/Boot/qps-ploc/bootmgr.exe.mui
./efi/Boot/qps-ploc/memtest.exe.mui
./efi/Boot/ro-RO
./efi/Boot/ro-RO/bootmgr.exe.mui
./efi/Boot/ru-RU
./efi/Boot/ru-RU/bootmgr.exe.mui
./efi/Boot/ru-RU/memtest.exe.mui
./efi/Boot/sk-SK
./efi/Boot/sk-SK/bootmgr.exe.mui
./efi/Boot/sl-SI
./efi/Boot/sl-SI/bootmgr.exe.mui
./efi/Boot/sr-Latn-CS
./efi/Boot/sr-Latn-CS/bootmgr.exe.mui
./efi/Boot/sv-SE
./efi/Boot/sv-SE/bootmgr.exe.mui
./efi/Boot/sv-SE/memtest.exe.mui
./efi/Boot/tr-TR
./efi/Boot/tr-TR/bootmgr.exe.mui
./efi/Boot/tr-TR/memtest.exe.mui
./efi/Boot/uk-UA
./efi/Boot/uk-UA/bootmgr.exe.mui
./efi/Boot/zh-CN
./efi/Boot/zh-CN/bootmgr.exe.mui
./efi/Boot/zh-CN/memtest.exe.mui
./efi/Boot/zh-HK
./efi/Boot/zh-HK/bootmgr.exe.mui
./efi/Boot/zh-HK/memtest.exe.mui
./efi/Boot/zh-TW
./efi/Boot/zh-TW/bootmgr.exe.mui
./efi/Boot/zh-TW/memtest.exe.mui
./efi/Boot/BOOTSTAT.DAT
./efi/Boot/Fonts
./efi/Boot/Fonts/chs_boot.ttf
./efi/Boot/Fonts/cht_boot.ttf
./efi/Boot/Fonts/jpn_boot.ttf
./efi/Boot/Fonts/kor_boot.ttf
./efi/Boot/Fonts/malgunn_boot.ttf
./efi/Boot/Fonts/malgun_boot.ttf
./efi/Boot/Fonts/meiryon_boot.ttf
./efi/Boot/Fonts/meiryo_boot.ttf
./efi/Boot/Fonts/msjhn_boot.ttf
./efi/Boot/Fonts/msjh_boot.ttf
./efi/Boot/Fonts/msyhn_boot.ttf
./efi/Boot/Fonts/msyh_boot.ttf
./efi/Boot/Fonts/segmono_boot.ttf
./efi/Boot/Fonts/segoen_slboot.ttf
./efi/Boot/Fonts/segoe_slboot.ttf
./efi/Boot/Fonts/wgl4_boot.ttf
./efi/Boot/Resources
./efi/Boot/Resources/bootres.dll
./efi/Boot/Resources/de-DE
./efi/Boot/Resources/de-DE/bootres.dll.mui
./efi/Boot/BCD
./efi/Boot/BCD.LOG1
./efi/Boot/BCD.LOG2
./efi/bootmgr
./efi/BOOTNXT
./efi/EFI
./efi/EFI/Microsoft
./efi/EFI/Microsoft/Boot
./efi/EFI/Microsoft/Boot/bg-BG
./efi/EFI/Microsoft/Boot/bg-BG/bootmgfw.efi.mui
./efi/EFI/Microsoft/Boot/bg-BG/bootmgr.efi.mui
./efi/EFI/Microsoft/Boot/boot.stl
./efi/EFI/Microsoft/Boot/bootmgr.efi
./efi/EFI/Microsoft/Boot/cs-CZ
./efi/EFI/Microsoft/Boot/cs-CZ/bootmgfw.efi.mui
./efi/EFI/Microsoft/Boot/cs-CZ/bootmgr.efi.mui
./efi/EFI/Microsoft/Boot/cs-CZ/memtest.efi.mui
./efi/EFI/Microsoft/Boot/da-DK
./efi/EFI/Microsoft/Boot/da-DK/bootmgfw.efi.mui
./efi/EFI/Microsoft/Boot/da-DK/bootmgr.efi.mui
./efi/EFI/Microsoft/Boot/da-DK/memtest.efi.mui
./efi/EFI/Microsoft/Boot/de-DE
./efi/EFI/Microsoft/Boot/de-DE/bootmgfw.efi.mui
./efi/EFI/Microsoft/Boot/de-DE/bootmgr.efi.mui
./efi/EFI/Microsoft/Boot/de-DE/memtest.efi.mui
./efi/EFI/Microsoft/Boot/el-GR
./efi/EFI/Microsoft/Boot/el-GR/bootmgfw.efi.mui
./efi/EFI/Microsoft/Boot/el-GR/bootmgr.efi.mui
./efi/EFI/Microsoft/Boot/el-GR/memtest.efi.mui
./efi/EFI/Microsoft/Boot/en-GB
./efi/EFI/Microsoft/Boot/en-GB/bootmgfw.efi.mui
./efi/EFI/Microsoft/Boot/en-GB/bootmgr.efi.mui
./efi/EFI/Microsoft/Boot/en-US
./efi/EFI/Microsoft/Boot/en-US/bootmgfw.efi.mui
./efi/EFI/Microsoft/Boot/en-US/bootmgr.efi.mui
./efi/EFI/Microsoft/Boot/en-US/memtest.efi.mui
./efi/EFI/Microsoft/Boot/es-ES
./efi/EFI/Microsoft/Boot/es-ES/bootmgfw.efi.mui
./efi/EFI/Microsoft/Boot/es-ES/bootmgr.efi.mui
./efi/EFI/Microsoft/Boot/es-ES/memtest.efi.mui
./efi/EFI/Microsoft/Boot/et-EE
./efi/EFI/Microsoft/Boot/et-EE/bootmgfw.efi.mui
./efi/EFI/Microsoft/Boot/et-EE/bootmgr.efi.mui
./efi/EFI/Microsoft/Boot/fi-FI
./efi/EFI/Microsoft/Boot/fi-FI/bootmgfw.efi.mui
./efi/EFI/Microsoft/Boot/fi-FI/bootmgr.efi.mui
./efi/EFI/Microsoft/Boot/fi-FI/memtest.efi.mui
./efi/EFI/Microsoft/Boot/fr-FR
./efi/EFI/Microsoft/Boot/fr-FR/bootmgfw.efi.mui
./efi/EFI/Microsoft/Boot/fr-FR/bootmgr.efi.mui
./efi/EFI/Microsoft/Boot/fr-FR/memtest.efi.mui
./efi/EFI/Microsoft/Boot/hr-HR
./efi/EFI/Microsoft/Boot/hr-HR/bootmgfw.efi.mui
./efi/EFI/Microsoft/Boot/hr-HR/bootmgr.efi.mui
./efi/EFI/Microsoft/Boot/hu-HU
./efi/EFI/Microsoft/Boot/hu-HU/bootmgfw.efi.mui
./efi/EFI/Microsoft/Boot/hu-HU/bootmgr.efi.mui
./efi/EFI/Microsoft/Boot/hu-HU/memtest.efi.mui
./efi/EFI/Microsoft/Boot/it-IT
./efi/EFI/Microsoft/Boot/it-IT/bootmgfw.efi.mui
./efi/EFI/Microsoft/Boot/it-IT/bootmgr.efi.mui
./efi/EFI/Microsoft/Boot/it-IT/memtest.efi.mui
./efi/EFI/Microsoft/Boot/ja-JP
./efi/EFI/Microsoft/Boot/ja-JP/bootmgfw.efi.mui
./efi/EFI/Microsoft/Boot/ja-JP/bootmgr.efi.mui
./efi/EFI/Microsoft/Boot/ja-JP/memtest.efi.mui
./efi/EFI/Microsoft/Boot/ko-KR
./efi/EFI/Microsoft/Boot/ko-KR/bootmgfw.efi.mui
./efi/EFI/Microsoft/Boot/ko-KR/bootmgr.efi.mui
./efi/EFI/Microsoft/Boot/ko-KR/memtest.efi.mui
./efi/EFI/Microsoft/Boot/lt-LT
./efi/EFI/Microsoft/Boot/lt-LT/bootmgfw.efi.mui
./efi/EFI/Microsoft/Boot/lt-LT/bootmgr.efi.mui
./efi/EFI/Microsoft/Boot/lv-LV
./efi/EFI/Microsoft/Boot/lv-LV/bootmgfw.efi.mui
./efi/EFI/Microsoft/Boot/lv-LV/bootmgr.efi.mui
./efi/EFI/Microsoft/Boot/memtest.efi
./efi/EFI/Microsoft/Boot/nb-NO
./efi/EFI/Microsoft/Boot/nb-NO/bootmgfw.efi.mui
./efi/EFI/Microsoft/Boot/nb-NO/bootmgr.efi.mui
./efi/EFI/Microsoft/Boot/nb-NO/memtest.efi.mui
./efi/EFI/Microsoft/Boot/nl-NL
./efi/EFI/Microsoft/Boot/nl-NL/bootmgfw.efi.mui
./efi/EFI/Microsoft/Boot/nl-NL/bootmgr.efi.mui
./efi/EFI/Microsoft/Boot/nl-NL/memtest.efi.mui
./efi/EFI/Microsoft/Boot/pl-PL
./efi/EFI/Microsoft/Boot/pl-PL/bootmgfw.efi.mui
./efi/EFI/Microsoft/Boot/pl-PL/bootmgr.efi.mui
./efi/EFI/Microsoft/Boot/pl-PL/memtest.efi.mui
./efi/EFI/Microsoft/Boot/pt-BR
./efi/EFI/Microsoft/Boot/pt-BR/bootmgfw.efi.mui
./efi/EFI/Microsoft/Boot/pt-BR/bootmgr.efi.mui
./efi/EFI/Microsoft/Boot/pt-BR/memtest.efi.mui
./efi/EFI/Microsoft/Boot/pt-PT
./efi/EFI/Microsoft/Boot/pt-PT/bootmgfw.efi.mui
./efi/EFI/Microsoft/Boot/pt-PT/bootmgr.efi.mui
./efi/EFI/Microsoft/Boot/pt-PT/memtest.efi.mui
./efi/EFI/Microsoft/Boot/qps-ploc
./efi/EFI/Microsoft/Boot/qps-ploc/bootmgfw.efi.mui
./efi/EFI/Microsoft/Boot/qps-ploc/bootmgr.efi.mui
./efi/EFI/Microsoft/Boot/qps-ploc/memtest.efi.mui
./efi/EFI/Microsoft/Boot/ro-RO
./efi/EFI/Microsoft/Boot/ro-RO/bootmgfw.efi.mui
./efi/EFI/Microsoft/Boot/ro-RO/bootmgr.efi.mui
./efi/EFI/Microsoft/Boot/ru-RU
./efi/EFI/Microsoft/Boot/ru-RU/bootmgfw.efi.mui
./efi/EFI/Microsoft/Boot/ru-RU/bootmgr.efi.mui
./efi/EFI/Microsoft/Boot/ru-RU/memtest.efi.mui
./efi/EFI/Microsoft/Boot/sk-SK
./efi/EFI/Microsoft/Boot/sk-SK/bootmgfw.efi.mui
./efi/EFI/Microsoft/Boot/sk-SK/bootmgr.efi.mui
./efi/EFI/Microsoft/Boot/sl-SI
./efi/EFI/Microsoft/Boot/sl-SI/bootmgfw.efi.mui
./efi/EFI/Microsoft/Boot/sl-SI/bootmgr.efi.mui
./efi/EFI/Microsoft/Boot/sr-Latn-CS
./efi/EFI/Microsoft/Boot/sr-Latn-CS/bootmgfw.efi.mui
./efi/EFI/Microsoft/Boot/sr-Latn-CS/bootmgr.efi.mui
./efi/EFI/Microsoft/Boot/sv-SE
./efi/EFI/Microsoft/Boot/sv-SE/bootmgfw.efi.mui
./efi/EFI/Microsoft/Boot/sv-SE/bootmgr.efi.mui
./efi/EFI/Microsoft/Boot/sv-SE/memtest.efi.mui
./efi/EFI/Microsoft/Boot/tr-TR
./efi/EFI/Microsoft/Boot/tr-TR/bootmgfw.efi.mui
./efi/EFI/Microsoft/Boot/tr-TR/bootmgr.efi.mui
./efi/EFI/Microsoft/Boot/tr-TR/memtest.efi.mui
./efi/EFI/Microsoft/Boot/uk-UA
./efi/EFI/Microsoft/Boot/uk-UA/bootmgfw.efi.mui
./efi/EFI/Microsoft/Boot/uk-UA/bootmgr.efi.mui
./efi/EFI/Microsoft/Boot/zh-CN
./efi/EFI/Microsoft/Boot/zh-CN/bootmgfw.efi.mui
./efi/EFI/Microsoft/Boot/zh-CN/bootmgr.efi.mui
./efi/EFI/Microsoft/Boot/zh-CN/memtest.efi.mui
./efi/EFI/Microsoft/Boot/zh-HK
./efi/EFI/Microsoft/Boot/zh-HK/bootmgfw.efi.mui
./efi/EFI/Microsoft/Boot/zh-HK/bootmgr.efi.mui
./efi/EFI/Microsoft/Boot/zh-TW
./efi/EFI/Microsoft/Boot/zh-TW/bootmgfw.efi.mui
./efi/EFI/Microsoft/Boot/zh-TW/bootmgr.efi.mui
./efi/EFI/Microsoft/Boot/zh-TW/memtest.efi.mui
./efi/EFI/Microsoft/Boot/BOOTSTAT.DAT
./efi/EFI/Microsoft/Boot/Fonts
./efi/EFI/Microsoft/Boot/Fonts/chs_boot.ttf
./efi/EFI/Microsoft/Boot/Fonts/cht_boot.ttf
./efi/EFI/Microsoft/Boot/Fonts/jpn_boot.ttf
./efi/EFI/Microsoft/Boot/Fonts/kor_boot.ttf
./efi/EFI/Microsoft/Boot/Fonts/malgunn_boot.ttf
./efi/EFI/Microsoft/Boot/Fonts/malgun_boot.ttf
./efi/EFI/Microsoft/Boot/Fonts/meiryon_boot.ttf
./efi/EFI/Microsoft/Boot/Fonts/meiryo_boot.ttf
./efi/EFI/Microsoft/Boot/Fonts/msjhn_boot.ttf
./efi/EFI/Microsoft/Boot/Fonts/msjh_boot.ttf
./efi/EFI/Microsoft/Boot/Fonts/msyhn_boot.ttf
./efi/EFI/Microsoft/Boot/Fonts/msyh_boot.ttf
./efi/EFI/Microsoft/Boot/Fonts/segmono_boot.ttf
./efi/EFI/Microsoft/Boot/Fonts/segoen_slboot.ttf
./efi/EFI/Microsoft/Boot/Fonts/segoe_slboot.ttf
./efi/EFI/Microsoft/Boot/Fonts/wgl4_boot.ttf
./efi/EFI/Microsoft/Boot/Resources
./efi/EFI/Microsoft/Boot/Resources/bootres.dll
./efi/EFI/Microsoft/Boot/Resources/de-DE
./efi/EFI/Microsoft/Boot/Resources/de-DE/bootres.dll.mui
./efi/EFI/Microsoft/Boot/BCD
./efi/EFI/Microsoft/Boot/BCD.LOG
./efi/EFI/Microsoft/Boot/BCD.LOG1
./efi/EFI/Microsoft/Boot/BCD.LOG2
./efi/EFI/Microsoft/Boot/bkpbootmgfw.efi
./efi/EFI/Microsoft/Boot/bootmgfw.efi
./efi/EFI/Microsoft/Boot/bootx64.efi.grb
./efi/EFI/Microsoft/Boot/bootx64.efi
./efi/EFI/Boot
./efi/EFI/Boot/bkpbootx64.efi
./efi/EFI/Boot/bootx64.efi
./efi/EFI/ubuntu
./efi/EFI/ubuntu/shimx64.efi
./efi/EFI/ubuntu/grubx64.efi
./efi/EFI/ubuntu/grub.cfg


(initramfs) Unable to find a medium containing a live file system?? - If you ask google you get something like: Do not use a usb 3.0 port... Great... There is no usb 2.0 port on my device....
sudo bash
add-apt-repository ppa:yannubuntu/boot-repair
apt-get update
apt-get install boot-repair
boot-repair


C:\Users\schroff>"\Program Files\Oracle\VirtualBox\VBoxManage.exe" clonehd
"c:\Users\schroff\VirtualBox VMs\Debian64-DS\Debian64-DS.vdi"
"c:\Users\schroff\VirtualBox VMs\Debian64-DS-Hyper-V"\Debian-DS.vhd
-format vhd
0%...10%...20%...30%...40%...50%...60%...70%...80%...90%...100%
Clone hard disk created in format 'vhd'. UUID: c42129a8-c145-4a50-908c-023c8ed2b711
Device Drivers --> Network device support -->

Device Drivers --> Microsoft Hyper-V guest support -->

Device Drivers --> HID Support --> Special HID Drivers -->


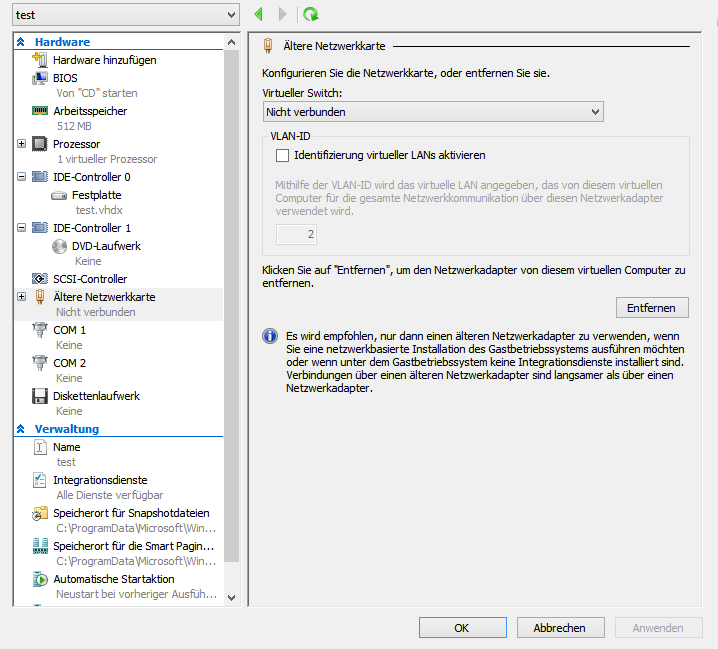
And now think about, for which type of network adapter the standard kernel has a kernel modul (or you can get sources for)... Right. Only the legacy adapter.
A network adapter requires a virtual machine driver in order to work, but offers better performance. This driver is included with some newer versions of Windows. On all other supported operating systems, install integration services in the guest operating system to install the virtual machine driver. For instructions, see Install a Guest Operating System. For more information about which operating systems are supported and which of those require you to install integration services, see About Virtual Machines and Guest Operating Systems (http://go.microsoft.com/fwlink/?LinkID=128037). A legacy network adapter works without installing a virtual machine driver. The legacy network adapter emulates a physical network adapter, multiport DEC 21140 10/100TX 100 MB. A legacy network adapter also supports network-based installations because it includes the ability to boot to the Pre-Execution Environment (PXE boot). However, the legacy network adapter is not supported in the 64-bit edition of Windows Server 2003.


C:\ProgramData\Microsoft\Windows\Start Menu\Programs\Hyper-V Management Toolsand double click the icon:


%windir%\system32\mmc.exe "%windir%\system32\virtmgmt.msc"And you will get: